
Are you tired of writing long texts to describe something or writing long comments? Here is an easy way to do it. In this blog, we will use Azure Cognitive Services to enable you to record your speech and convert it into text. We will break down the process into multiple steps so you can easily follow them.
1. Setting up Azure Cognitive Services
Create an Azure account if you don’t have one already.
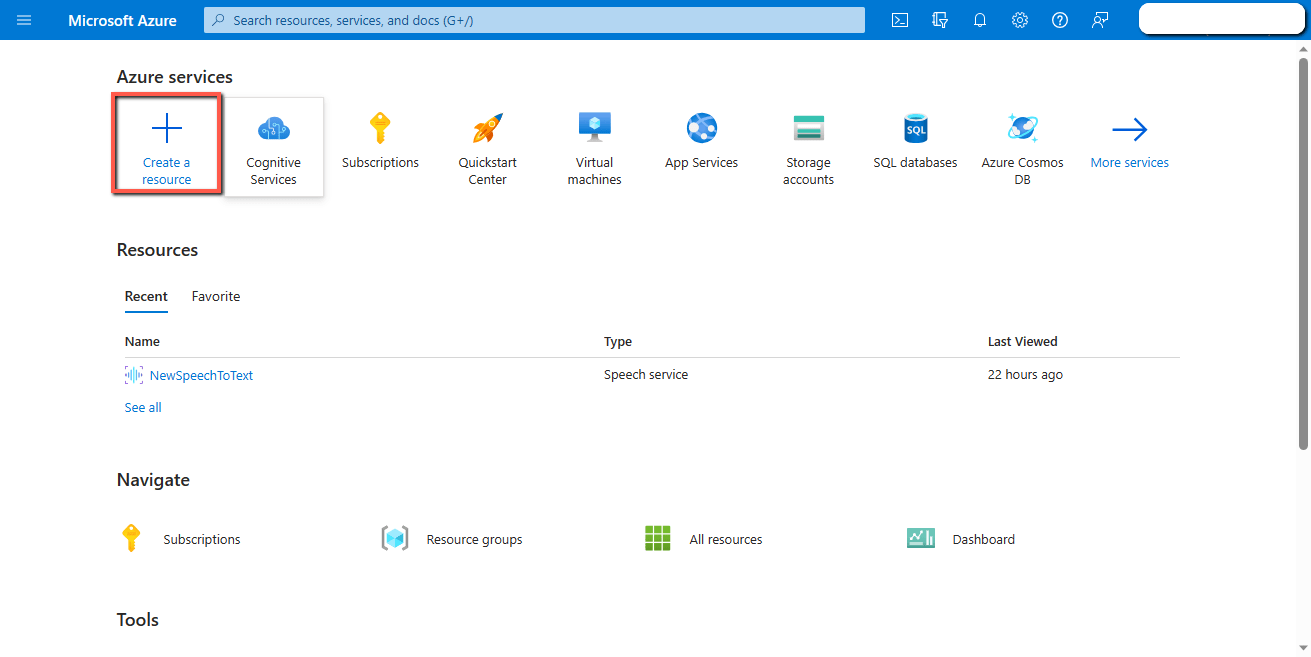
Go to the Azure portal.

Click on the “Create a resource” button.
Search and select “Speech” by Microsoft Azure Service.

Click on the “Create” button.

Select the “Resource group”, write the “Name”, and click on the “Review + create” button.

Click on the “Create” button.

Copy the “Keys”, “Location/Region”, and “Endpoint” details to use in next step.

2. Create Cloud Convert API
We need a cloud convert connector in Power Automate to convert the audio received from PowerApps into a “.wav” format that is acceptable by Azure Cognitive Services.
Sign up or Login to Cloud Convert.

Open the following link to get your API key.
https://cloudconvert.com/dashboard/api/v2/keys

Save the API key to use in next step.
3. Create Power Automate Flow
Create an “Instant” flow.

Add an “Initialize variable” action, write the “varAudio” in “Name” field, set type to “String”, and for “Value” click on the “Ask in PowerApps”.

Add a “Convert File” by Cloud Convert action and write values as follow.
Paste following expression in the “Input File Content” field.
base64ToBinary(variables(‘varAudio’))
In the “Input filename” field, write the filename with the “.webm” extension. Select “wav” in the “Output Format” field.

Add an “HTTP” action and do the following configurations.
Method: POST
Note: Make sure to use your region code in the URL.
Headers:
| Accept | application/json;text/xml |
| Content-Type | audio/wav; codecs=audio/pcm; samplerate=16000; |
| Ocp-Apim-Subscription-Key | Azure API Key |
| Host | eastus.stt.speech.microsoft.com |
| Transfer-Encoding | Chunked |
| Expect | 100-continue |
Body: File content of “Convert File” action.

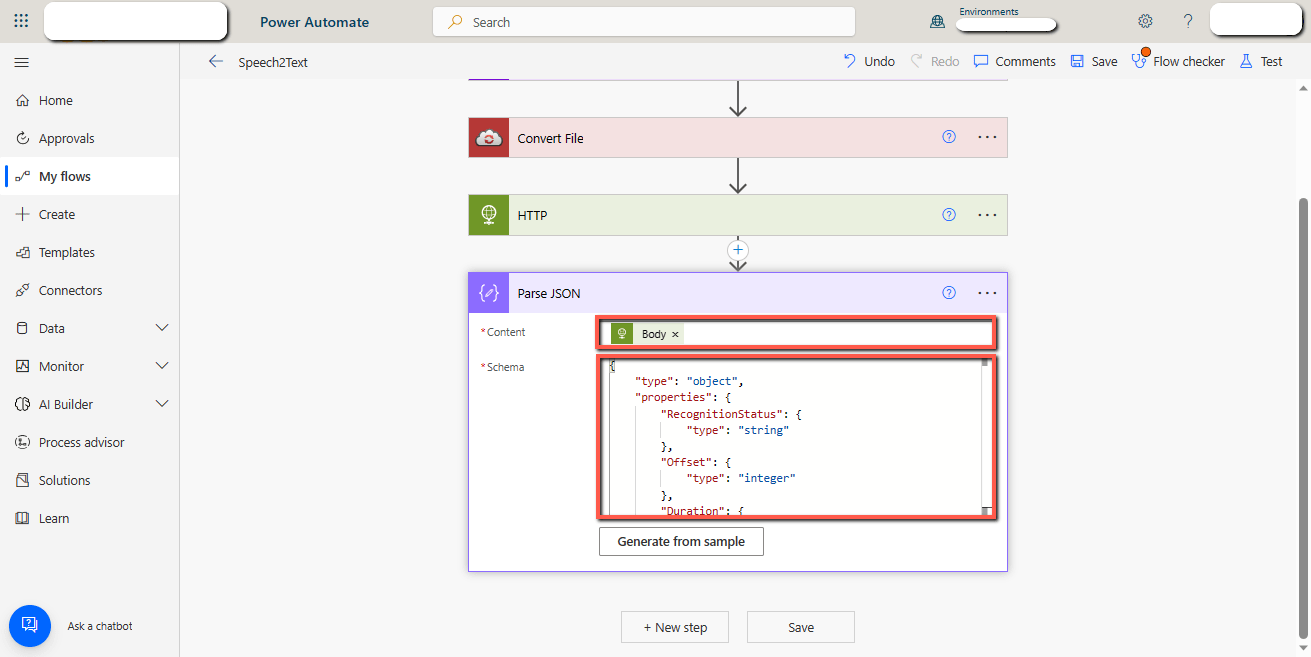
Add a “Parse JSON” action and pass values as follow.
Content: body of the “HTTP” action.
Schema:
{
“type”: “object”,
“properties”: {
“RecognitionStatus”: {
“type”: “string”
},
“Offset”: {
“type”: “integer”
},
“Duration”: {
“type”: “integer”
},
“DisplayText”: {
“type”: “string”
}
}
}
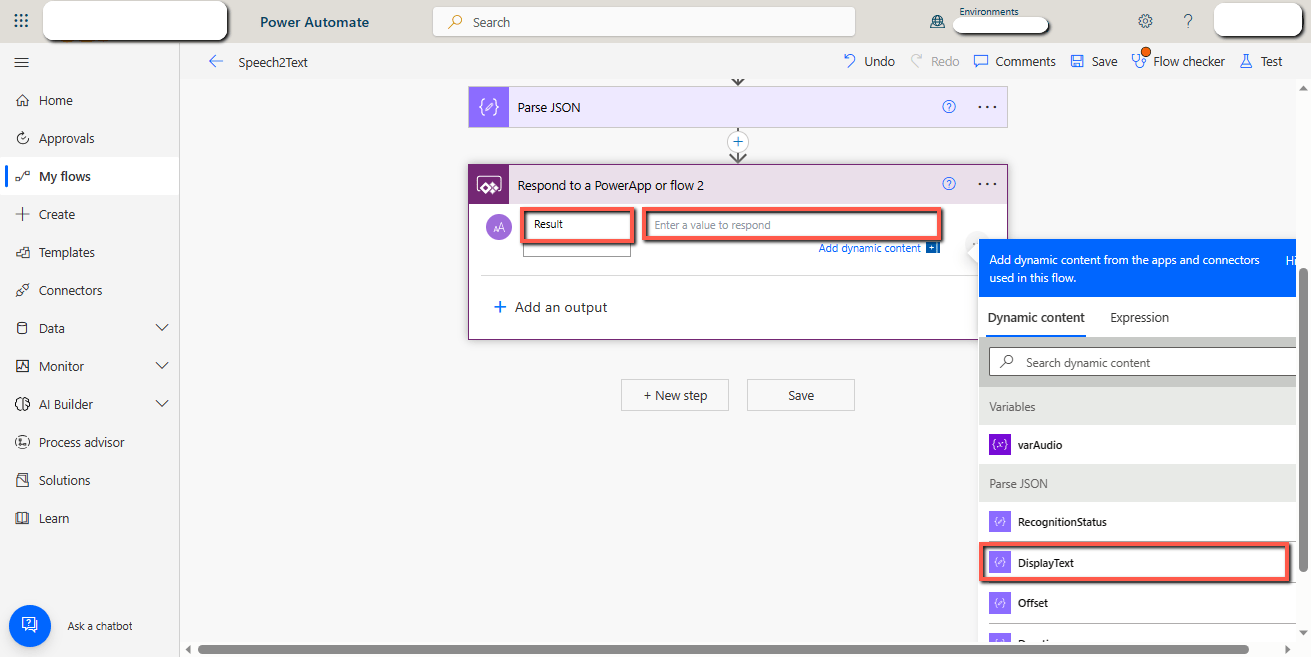
Add a “Respond to PowerApps or flow” action.
Write the “Name” and pass the “DisplayText” value coming from “Parse JSON” action.
The flow is ready. Save it.
4. Create an App
Go to PowerApps studio and create a new Canvas app.

Insert a “Microphone” control.

Insert an “Audio” control, a “TextInput” field, and a “Button” control.

Connect “Speech2Text” flow with PowerApps.

Select the “OnSelect” property of the “Convert” button, copy the code given below and paste it into the top bar.
Set(
varAudio,
JSON(
Microphone1.Audio,
JSONFormat.IncludeBinaryData
)
);
Set(
varBase64,
Mid(
varAudio,
25,
Len(varAudio) – 25
)
);
Set(
varResult,
Speech2Text.Run(varBase64).result
)
Select the “Default” property of the “TextInput” field and write “varResult” into the top bar.

The speech to text feature is ready to use.
5. Test the App
Play the app, click on the microphone, record an audio, and click on the “Convert” button.

The output text becomes visible in the “TextInput” field.

Conclusion
Azure Cognitive Services and Power Automate can empower your PowerApps application with speech-to-text capability. Just create a Speech resource in Azure and a Power Automate flow to make the interaction between Azure and PowerApps.